
Tutorial: Easily Using Azure CDN with ASP.NET MVC Projects
Happy June, readers! I recently helped design a AlliesForACure.com, a web site for a charity contest (Ed. note: unfortunately the link has been lost to time). We had some static content (images, etc.) and wanted to keep pages loading quickly while keeping our costs low.
This sounded like a job for Azure CDN. But I had never used it before, so I figured this would be a good opportunity to make a blog post out of it.
In this article, we’ll:
- Discuss the merits of a CDN
- Setup an Azure storage account and add some files
- Setup an Azure CDN in front of the storage account
- Add a Sub-Domain for the Storage Account
- Add a
HtmlHelperthat will make it easier to reference CDN content - Enable CDN versioning and update our helper to include it.
Back up a second – What’s all this CDN Business about?
What a CDN Does
In short, all the stuff sitting on your server – your web site’s images, videos, sound files, style sheets, etc. – all has to be served up to the user. What we often neglect is that those files have to be transferred all the way from the server to the user’s PC, which takes time and costs bandwidth. If your server is in New York, and your user is in California, the files have to travel all the way there.
CDNs distribute your files to various places around the globe, and are really good at caching them. As a result, if your server is in New York, and your user is in California, when they go to the URL for the image, it might actually be served to the from some place much closer, saving valuable time.
Why CDNs? Why Azure CDN?
Why use a CDN? Because it can dramatically cut down on load time for your users, and most of the time it adds value to the price you’d be paying to serve these files up on your own anyway.
Why use Azure CDN? In this case, just because I want to play around with it. There are many credible alternatives out there. In our case, our site was already served with Azure, so I figured why not?
First Step: Think About The Content You Want to Serve
CDNs often involve the concept of “containers”, a sort of one-level folder structure. Azure is no different. So, I wanted to think about the different types of content I wanted to serve up. This boiled down to:
- Site images (logo, favicon, etc.)
- Headshots of team members
- Photos that we used in the campaign
Setting up the Storage Component
Prerequisites
I assume you have an Azure account and have used the portal before. If not, it’s not that hard to do – I have faith in you. Let me know in the comments if you’re having trouble.
Create an Azure Storage Account
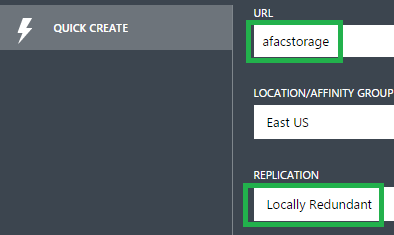
- From the Azure Management Site 1, follow the path to quick create a storage account:

- Enter your details, providing a name, region, and replication style. NOTE: We chose
Locally Redundantbecause it will ensure that the data is kept in 3 places in our region. We don’t need data reliability across continents since our audience is in the Eastern US.
Obtain Your Access Key
While we’re here, we’ll snag your access key. You’ll need this when connecting to your account later.
- Click on the Storage account once it is created
- At the bottom of the screen, click on
Manage Access Keys:

- Click the Copy icon next to the Primary access key:
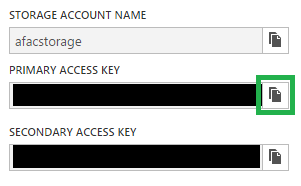
- Paste it somewhere temporarily. You’ll use it in a little bit.
Create Your Containers and Add Your Files
There are tons of ways to get files into Microsoft Azure. For this exercise, we’ll use Azure Storage Explorer, because it’s a GUI tool that will get the job done quickly.
Installing Azure Storage Explorer
- Point your browser to the Azure Storage Explorer Download Page and download the latest version
- Unzip the files
- Run the installer.
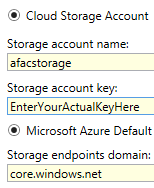
Add Your Storage Account to Azure Storage Explorer
- Run the Azure Storage Explorer program.
- Click
Add Accountat the top of the screen:

- Enter your storage account name (the name you gave the storage in Azure), and the storage account key that you copied earlier:
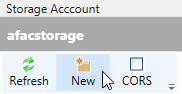
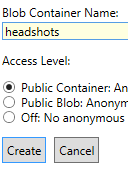
Create a Container
- On the left-hand side, click on the
Newbutton to create a new Container:
- Enter the container’s name and whether or not you want it to be private or public – for CDN purposes you’ll usually need it to be public.2
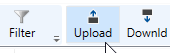
Add Files
- Click into the container you just created, and select
Upload:
- Select multiple files for upload – in this case, headshots of our awesome team:
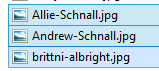
Once those files are uploaded, you’re all set!
Create the CDN on top of the Storage Account
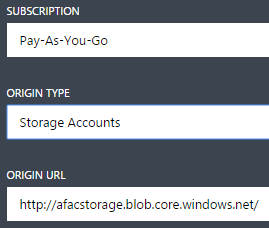
- Back in the Azure Storage Portal, select
New --> App Services --> CDN --> Quick Create. - Select your subscription,
Storage Accountsfor the origin type, and choose the URL for the origin as the storage account you created earlier.
- Azure will create your CDN with a random name, something like ours which is
az766003.
Accessing your files via CDN
Voila! With the CDN created, we can now access our files. To do this, we look at how an Azure CDN URL is constructed.
http://[CDN Endpoint].vo.msecnd.net/[Container]/[ImageName.extension]
- CDN Endpoint is the endpoint of your CDN, e.g.
az766003. - Container is the name of your container, e.g.
headshots. - ImageName.extension is the image, such as
image.png
So if we wanted to get to an image in our headshots container, we could type http://az766003.vo.msecnd.net/headshots/image.png.3
But honestly, That long-ass URL is gross and doesn’t feel like our domain. Wouldn’t it be great if it was a little more home-y, like say cdn.alliesforacure.com?
Yeah. Let’s do that.
Set Up a sub-domain that points to your CDN
On this project, we use NameCheap as our registrar – I’m a big fan of theirs.
Add the Sub-domain with your DNS provider
- Open the domain settings from our main list of domains.
- Click on “All Host Records”.4
- Add a sub-domain of
cdn, with a CNAME pointing to[your cdn name].vo.msecnd.net, e.g.az766003.vo.msecnd.net.

- Save the settings.
Adding the Sub-Domain to the Azure CDN
- In the management portal, enter the screen for your CDN.
- Click on
Manage Domains:

- Enter the domain name, e.g.
cdn.alliesforacure.comin the box, wait for the green indicator and then click the checkmark to complete the process. 5

Potential Problems with the Current Setup
Even with that nice new sub-domain, there could be some issues ahead:
- If you decide to change the subdomain, or you move to different CDN point, the beginning of the URL could change.
- Similarly with the blob name or the file name.
- If these URLs are all over the place, changing them could be a huge bummer or at best a find & replace operation.
With MVC’s goodies, it shouldn’t be hard to whip something up to help manage this complexity.
Making it Easier: An HtmlHelper for CDN Content
I know, I know – let’s get to some code! We can use HtmlHelpers in MVC to achieve this.
I’d like to add the capability for someone to use Html.CDN("cdnUrl", "containerName", "fileName.png") to specify where to load a piece of CDN content from.
Better yet, let’s add an overload – if the user doesn’t specify the CDN URL, we’ll look for it in a pre-defined app setting.
This small bit of code should work just fine:
public static class CDNHelper
{
    public static string CDN(this HtmlHelper helper, string containerName, string blobName)
    {
        //If they don't provide a baseUrl, look for it in the AppSettings
        var baseUrl = ConfigurationManager.AppSettings["CDNBaseUrl"];
        return CDN(helper, baseUrl, containerName, blobName);
    }

    public static string CDN(this HtmlHelper helper, string baseUrl, string containerName, string blobName)
    {
        var baseUrlToUse = RemoveTrailingSlashFrom(baseUrl);
        var containerToUse = RemoveTrailingSlashFrom(containerName);

        return string.Format("{0}/{1}/{2}", baseUrlToUse, containerToUse, blobName);
    }

    private static string RemoveTrailingSlashFrom(string stringToRemoveTrailingSlashFrom)
    {
        if (stringToRemoveTrailingSlashFrom.EndsWith("/"))
        {
            return stringToRemoveTrailingSlashFrom.Remove(stringToRemoveTrailingSlashFrom.Length - 1);
        }

        return stringToRemoveTrailingSlashFrom;
    }
}
What the heck does this code do?
This is an extension method onto HtmlHelper. When you call into it, it looks for the CDN at the CDNBaseUrl application setting.
It then removes any single trailing slashes from the baseUrl and the containerName on the off-chance you put them in there.
After that, it re-assembles the correct URL, which is what winds up in the place of wherever you used this HtmlHelper.
Now, instead of having to type http://az766003.vo.msecnd.net/headshots/image.png, we can use @Html.CDN("headshots", "image.png"). Much better.
I Changed the Files but the Files Didn’t change!
CDNs, as you might imagine, are really good at caching things so they can distribute them everywhere. But sometimes, you change something – like a logo, editing an image or css file, etc. – and you would really like that to work.
Don’t worry, we have something up our sleeves for you, too.
Adding “Versioning” to the CDN
Versioning a CDN works by appending a QueryString to the end of the url. The CDN thinks that image.png is different from image.png?v1. That means if you can auto-generate that little bit on the end, you’ll be able to refresh your CDN content whenever you need to.
Enabling QueryString versioning via Azure
- In the Azure Management Portal, go to your CDN’s section.
- Enable QueryStrings via the button at the bottom:

That’s all you need to do.
Updating our HtmlHelper to Support CDN Versioning
We add a boolean value for versioning and pass it through, defaulting to true:
public static string CDN(this HtmlHelper helper, string containerName, string blobName, bool versioning = true)
{
    //If they don't provide a baseUrl, look for it in the AppSettings
    var baseUrl = ConfigurationManager.AppSettings["CDNBaseUrl"];
    return CDN(helper, baseUrl, containerName, blobName, versioning);
}
And we add a branching statement when we concatenate the URL:
public static string CDN(this HtmlHelper helper, string baseUrl, string containerName, string blobName, bool versioning = true)
{
    var baseUrlToUse = RemoveTrailingSlashFrom(baseUrl);
    var containerToUse = RemoveTrailingSlashFrom(containerName);

    if (versioning)
    {
        var versionNumber = ConfigurationManager.AppSettings["CDNVersionNumber"];
        return string.Format("{0}/{1}/{2}?v{3}", baseUrlToUse, containerToUse, blobName, versionNumber);
    }

    return string.Format("{0}/{1}/{2}", baseUrlToUse, containerToUse, blobName);
}
Adding a Config setting in your project
We probably should specify a version number just so we have one. We add the following to our appSettings section in web.config:
<add key="CDNVersionNumber" value="1"/>
Now we can change that setting from web.config or override it within the Azure control panel and the static content will refresh every time. We could even hook this into a build system that increments it each time to ensure CDN content is updated when we push code.
Some Caveats
- CDNs cache content for a long time. You can get around this using Azure CDN QueryStrings, but be careful because it kind of defeats the purpose. Usually query strings are used with something like a version of a site, e.g.
myImage.jpg?v=1.2.3. - Don’t forget to check css files, etc. for urls to things like in-line images. I missed this at first and couldn’t figure out why certain things weren’t showing up. Just a brief moment of “d’oh!”.
That’s a Wrap!
I hope you found this useful. If you did, please consider making a donation at AlliesForACure.com.
Also, I’d love to hear your thoughts – sound off in the comments!
-
We’re using the management site instead of the shiny new Portal because as of this writing CDNs aren’t supported yet. I decided to keep things consistent. ↩
-
Now that I think of it, it may be possible to have private storage blobs but still expose them publicly via CDN. I don’t know if that’s possible, but definitely let me know if I’m wrong. ↩
-
By the way, the URL for the containers and blobs is case-sensitive.
image.pngis considered to be different thanImage.png. I got bit by that in the beginning. ↩ -
These may be known by various names, but they’re the DNS settings for the domain. ↩
-
You might see an error at this point saying there’s no entry. Sometimes DNS settings take a while to propagate, and you might seen an error for a few minutes. Double-check to make sure you saved everything and after a little bit you’ll be good to go. In my experience it takes 5-15 minutes. ↩
Leave a comment